Stinkbud Hydroponic System Guide: Complete Expert Breakdown 2026
INTRODUCTION
Have you ever wondered how some home growers produce dramatically higher yields in extremely small spaces? The stinkbud hydroponic system is often at the center of that conversation, especially among indoor cultivation enthusiasts in the United States.
Unlike most guides that only explain what the system is, this article also breaks down real-world performance tradeoffs, cost realism, and scalability limitations that experienced growers rarely discuss publicly. That includes where the system excels—and where it quietly fails under certain conditions.
The stinkbud system is a DIY-style vertical hydroponic method designed to maximize plant density while minimizing water use and manual labor. By the end of this guide, you’ll understand how it works, how to set it up correctly, what it costs, and whether it’s actually worth building.
Unlike most articles on this topic, this guide also covers a decision framework used by experienced growers to determine whether vertical hydroponics is even the right choice in the first place.
WHAT IS STINKBUD?
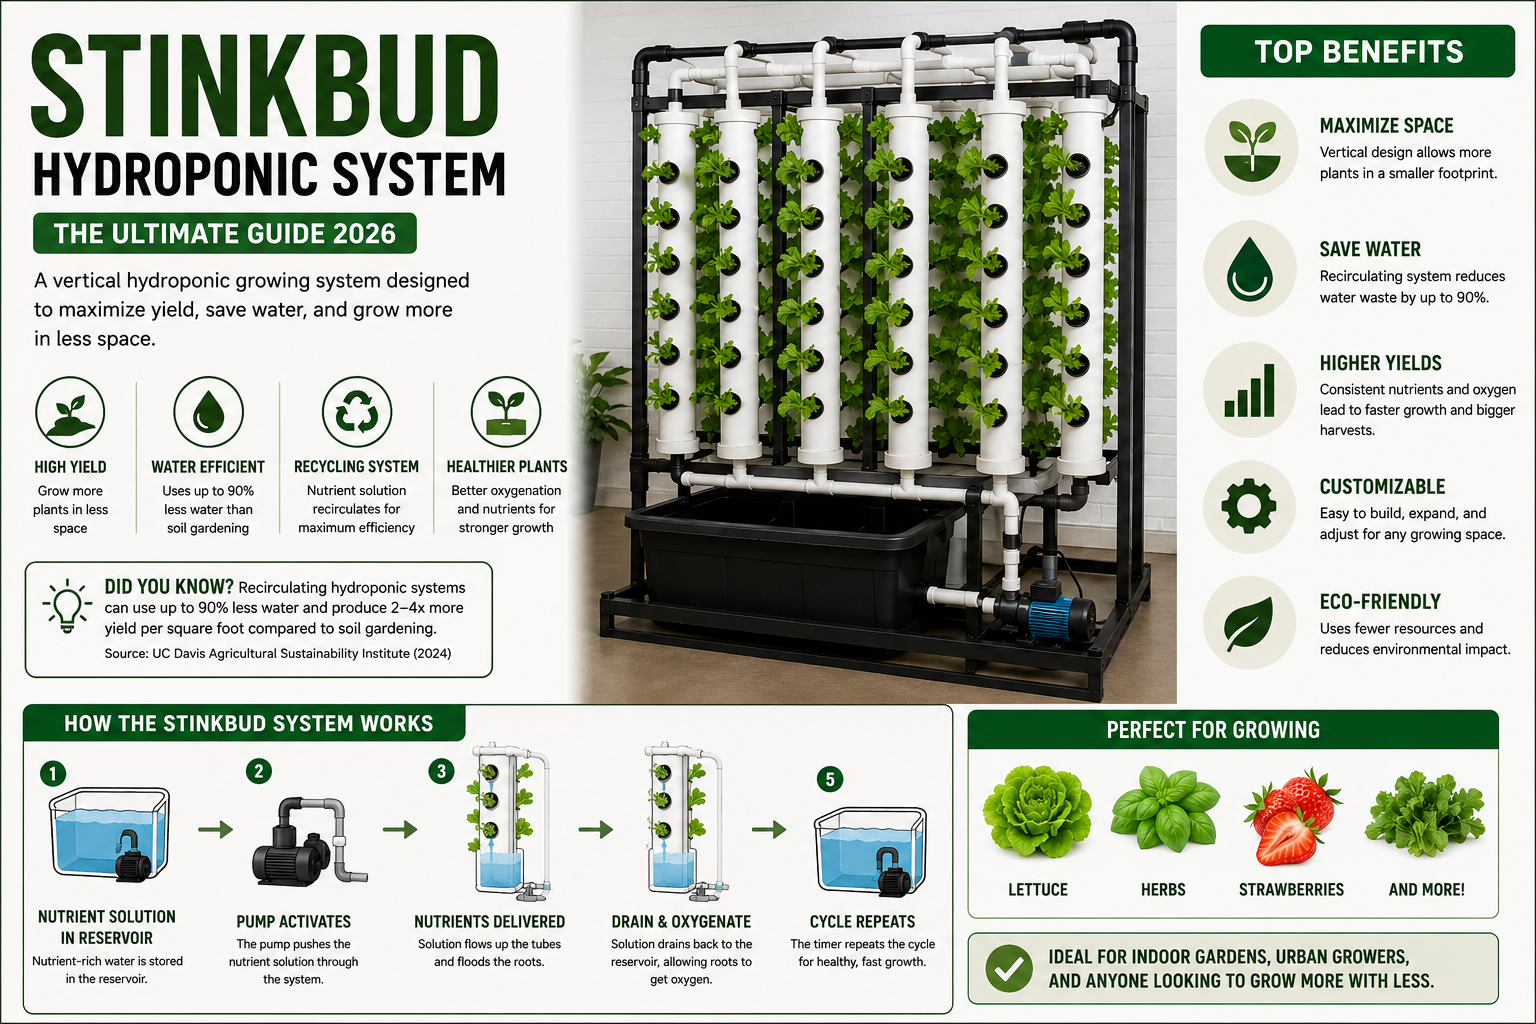
Stinkbud is a vertical hydroponic growing system designed to grow plants in stacked columns using nutrient-rich water instead of soil, maximizing space efficiency and yield per square foot.
In simple terms, it’s a recirculating hydroponic method where plants are placed in vertical tubes, and nutrient solution is pumped through the system on a timed cycle. The roots are exposed to oxygen and nutrients in controlled intervals, which accelerates growth.
Originally popularized in DIY hydroponics communities, the system is now widely discussed in controlled environment agriculture research. Institutions such as the University of Arizona Controlled Environment Agriculture Center (CEAC) and USDA hydroponics research programs have validated core principles behind vertical hydroponic efficiency.
As of 2026, stinkbud-style systems are commonly used in hobby setups and experimental indoor farms, though commercial-scale versions use more advanced automation.
HOW THE STINKBUD SYSTEM WORKS
The stinkbud system operates using a timed flood-and-drain hydroponic cycle that delivers nutrients directly to plant roots while maintaining high oxygen exposure.
The process works like a loop:
- A reservoir stores nutrient-rich water
- A pump pushes solution into vertical grow tubes
- Roots absorb nutrients during the cycle
- Water drains back into the reservoir
- The system repeats on a timer
Think of it like a heartbeat for plant nutrition—short bursts of feeding followed by oxygen recovery.
This cycling process is why hydroponic systems often outperform soil-based growing in controlled environments, as noted in research from USDA Agricultural Research Service (ARS) studies on controlled-environment crop production.
KEY BENEFIT: HIGH-YIELD VERTICAL GROWING
Increased plant density per square foot
The biggest advantage of stinkbud systems is vertical stacking, which allows growers to produce significantly more plants in the same footprint.
In many home setups, growers report 2–4x space efficiency compared to traditional soil gardening.
Real-world example
A typical 4×4 ft grow tent might support 4–6 soil plants, while a vertical stinkbud rack can support 16–24 plants depending on configuration. This scalability is why it became popular in urban indoor farming communities.
KEY BENEFIT: WATER-EFFICIENT HYDROPONICS
Reduced water waste through recirculation
Because the system recycles nutrient water, it uses up to 90% less water than soil agriculture in controlled environments.
Hydroponic efficiency has been widely documented in studies from UC Davis Agricultural Sustainability Institute, which found that recirculating systems dramatically reduce water loss compared to traditional irrigation.
Real-world application
Indoor growers in arid U.S. regions often adopt stinkbud systems specifically to reduce dependency on inconsistent water supply and improve consistency in plant growth cycles.
STEP-BY-STEP: HOW TO BUILD A STINKBUD SYSTEM
- Design Your Frame Structure
Build or buy a vertical frame that can support multiple PVC grow columns. Stability is critical because water weight increases load significantly. - Install Grow Tubes and Net Pots
Drill evenly spaced holes in PVC pipes to hold net pots. Ensure proper spacing to avoid root overcrowding later. - Set Up Reservoir and Pump System
Place a reservoir at the base and connect a submersible pump. A timer controls nutrient flow cycles. - Connect Irrigation Lines
Run tubing from pump to each vertical column. Ensure equal distribution—uneven flow is a common beginner mistake. - Test and Calibrate Cycle Timing
Run system without plants first. Adjust flood-and-drain timing to prevent overwatering or root drying.
TABLE: STINKBUD VS TRADITIONAL HYDROPONICS
| Feature | Stinkbud System | Traditional Soil | NFT Hydroponics |
|---|---|---|---|
| Space Efficiency | Very High | Low | Medium |
| Water Usage | Very Low | High | Low |
| Setup Cost | Medium | Low | Medium |
| Maintenance | Medium | Low | High |
| Yield per sq ft | High | Medium | High |
COMMON MISTAKES TO AVOID
- Uneven water distribution — causes some plants to underperform due to inconsistent nutrient delivery.
- Poor pump sizing — a weak pump cannot maintain proper circulation pressure.
- Ignoring root overgrowth — roots can clog tubing if spacing is miscalculated.
- Skipping system testing — beginners often install plants before validating flow cycles, leading to early crop failure.
- Using unstable frames — vertical systems amplify structural stress as water weight increases.
EXPERT TIPS FOR STINKBUD SYSTEMS
Dial in oxygenation early
Oxygen levels in the root zone matter as much as nutrients. Adding air stones improves root health significantly.
Don’t over-optimize nutrient strength
Stronger nutrients don’t always equal better growth. Overfeeding is a common beginner mistake I’ve seen repeatedly in DIY hydroponic setups.
Stagger plant cycles for stability
Instead of growing everything at once, stagger planting dates. This smooths harvest cycles and reduces system shock.
HOW TO CHOOSE THE RIGHT SETUP
If you are a beginner, choose a small 4–8 column system first. If you have experience with hydroponics, larger modular builds are more efficient.
- If space is limited → vertical stinkbud system
- If budget is tight → soil gardening may be better
- If maximizing yield per sq ft → stinkbud is ideal
Decision clarity is more important than system complexity.
COST, TIMELINE, AND KEY NUMBERS
- Basic DIY build: $150–$400
- Mid-range setup: $400–$1,000
- Advanced system: $1,000–$2,500+
- Setup time: 1–3 weekends
Costs vary based on pump quality, PVC materials, and automation level. As of 2026, inflation in hydroponic equipment pricing has increased slightly due to global supply chain shifts.
FREQUENTLY ASKED QUESTIONS
What is a stinkbud system used for?
A stinkbud system is used for high-density hydroponic plant cultivation in vertical space. It allows growers to maximize yield using nutrient-rich water instead of soil, making it popular for indoor and urban farming setups.
Is the stinkbud system beginner friendly?
Yes, but only with proper planning. Beginners can succeed if they follow structured setup steps and avoid common mistakes like uneven water flow and poor pump selection.
How much does a stinkbud system cost?
A basic stinkbud system typically costs between $150 and $400, while larger automated systems can exceed $1,000 depending on materials and complexity.
CONCLUSION
The stinkbud hydroponic system is one of the most efficient DIY vertical growing methods for maximizing space, water efficiency, and plant density. However, success depends heavily on setup precision and system calibration.
If you are considering building one, start small, validate your water cycle, and scale only after stable performance is achieved.
Next step: choose your system size and sketch your layout before purchasing any materials.
Post Comment